2018의 게시물 표시

[MPI] Loop Statement

반복문은 프로그래밍에서 자주 쓰이는 명령문 중 하나입니다. 오늘은 반복문을 MPI에서 병렬화 하는 방법에 대해서 다룹니다. MPI에는 병렬 반복문이 없지만, 프로세서 ID를 이용하면 간단하게 병령화 할 수 있습니다. 이를 위해서, MPI_COMM_RANK를 통해서 식별 가능하도록 프로세서 ID를 각각의 프로세서에 지정해줍니다. 이후 반복문을 다음과 같이 설정해 주면 병렬화가 가능합니다. program main use mpi integer :: ierr ! error signal variable. Standard value = 0 integer :: rank ! the process ID/NUMBER integer :: nprocs ! number of processes call MPI_INIT(ierr) call MPI_COMM_SIZE(MPI_COMM_WORLD, nprocs, ierr) call MPI_COMM_RANK(MPI_COMM_WORLD, rank, ierr) do i = rank + 1, 11, nprocs     print *, i, rank end do end program main 프로세서의 수가 4개인 컴퓨터에서 실행시키면 각각 2~3개의 프린트 명령어를 수행 할 것입니다. 순서는 지켜지지 않으며, 컴파일하고 실행시키면 다음과 같은 결과물을 얻을 수 있습니다. >>mpif90 mpitest.f90 >>mpiexec mpitest.exe            1           0            5           0            9           0            2           1            3           2            4           3            8           3            7           2           11          2            6           1  
[MPI] MPI_Scatter, MPI_Gather

이미지
Gather Purpose: If an array is scattered across all processes in the group and one wants to collect each piece of the array into a specified array on a single process, the call to use is GATHER. Scatter Purpose: On the other hand, if one wants to distribute the data into n segments, where the ith segment is sent to the ith process in the group which has n processes, use SCATTER. Think of it as the inverse to GATHER. We will first consider the basic form of these MPI gather/scatter operations, in which the number of data items collected from or sent to processes is the same for all processes, and the data items are arranged contiguously in order of process rank. The syntax is given below: C int MPI_Gather(const void* sbuf, int scount, \ MPI_Datatype stype, void* rbuf, int rcount, \ MPI_Datatype rtype, int root

[MPI] Collective communication - MPI_Bcast

· One to all : MPI_Bcast, MPI_Scater · All to one : MPI_Reduce, MPI_Gather · All to all : MPI_Alltoall - MPI_Bcast : Broadcasts a message from "root" process to all other process in the same communicator. - C/C++ : MPI_Bcast( array, 100, MPI_INT, 3, comm);  - Fortran : call MPI_Bcast( array, 100, MPI_INTEGER, 3, comm,ierr)  - Example Source Code program hello     use mpi     integer :: f(10)     integer :: status(MPI_STATUS_SIZE)     integer :: rank, src=0, dest=1, ierr, i     call mpi_init(ierr)      call MPI_Comm_rank( MPI_COMM_WORLD, rank,ierr);     !array preparation from src processor     if (rank == src) then           do i = 1, 10             f(i) = f(i) + i         end do     end if     !broad cast integer array     call MPI_Bcast(f, 10, MPI_INT, src, MPI_COMM_WORLD, ierr)     print *, f     call mpi_finalize(ierr) end program hello -Output C>>mpiexec -n 3 mpibcast.exe            1           2           3    

[MPI] Point to point communication

- MPI_Send : send data to another process - MPI_Send(buf, count, data_type, dest, tag, comm) Arguments Meanings buf Starting address of send buffer count # of elements data_type Data type of each send buffer element dest Processor ID (rank) destination tag Message tag comm communicator -Examples: C/C++: MPI_Send(&x,1,MPI_INT,5,0,MPI_COMM_WORLD); Fortran:MPI_Send(x,1,MPI_INTEGER,5,0,MPI_COMM_WORLD,ierr) - MPI_Recv : receive data from another process - MPI_Recv(buf, count, data_type, src, tag, comm, status) Arguments Meanings buf Starting address of send buffer count # of elements data_type Data type of each send buffer element src Processor ID (rank) destination tag Message tag comm communicator status Status object (an integer array in Fortran) - Examples C/C++: MPI_Recv(&x,1,MPI_INT,5,0,MPI_COMM_WORLD,&stat); Fortran: MPI_Recv(x,1,MPI_INTEGER,5,0,MPI_COMM_WORLD,stat,

[Windows] [Intel] MPI 컴파일과 실행하기

이미지
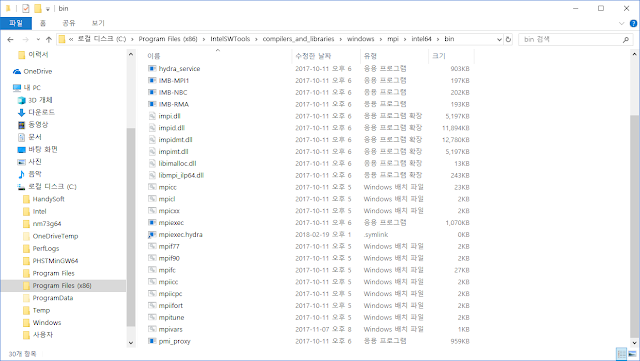
병렬 계산에서 Message Passing Interface(MPI)는 분산형 컴퓨터에서 많이 쓰이는 툴이다. MPI에는 주로 MPICH와 OpenMPI가 많이 알려져 있는데, 슈퍼컴퓨터 상위 10대중 9대가 MPICH를 채택했다고 한다(2016년 기준). 또한 인텔과 MS의 MPI는 MPICH으로부터 발전된 형태여서, 업계에서는 OpenMPI보다 MPICH가 주로 쓰인다고 말할 수 있다. 이글에서는 인텔에서 쓰이는 MPICH 기준으로 병렬계산 컴파일 방법에 대해서 다루도록 하겠다. 이 글에서 테스트로 사용한 소스코드는 다음과 같다. program hello_mpi     use mpi     implicit none     integer :: ierr ! error signal variable. Standard Value = 0     integer :: rank ! the process ID / Number     integer :: nprocs ! number of processes     ! Initialize MPI     call MPI_INIT(ierr)     ! Setup Communicator Size     call MPI_COMM_SIZE(MPI_COMM_WORLD, nprocs, ierr)     !Setup Ranks/IDs for each process     call MPI_COMM_RANK(MPI_COMM_WORLD, rank, ierr)     ! type the main code     print *, "Hello world! I am process " , rank, "of " , nprocs, "Process(es)"     ! Finilize MPI     call MPI_FINALIZE(ierr) end program hello_mpi 위 소스코드는 각각의의 프로세서로부터 ID / Number 를 받아와서 &quo

윈도우에서 mpich2 설치하기

병렬계산을 위해서, NONMEM(R) 에서는 File Passing Interface(FPI) 방법과 Message Passing Interface(MPI) 방법을 이용하고 있다. 주로 병렬 계산에서는 MPI가 많이 이용되고 있는데, 그중에서 NONMEM(R)에서는 MPICH2를 지원하고 있다. 이번 글에서는 MPICH2의 설치를 알아본다. 1. 관리자 권한으로 명령 프롬프트 창을 실행한다. 2. 관리자 명령 프롬프트에서 mpich2 설치를 한다. 예를 들어 MPICH2-1.4.1 윈도우 64bit 설치파일에 대한 설치실행 명령어는 다음과 같다.      cmd>>msiexec /i mpich2-1.4.1p1-win-x86-64 3. 디폴트 설정으로 설치를 진행하고, 모든 사람이 사용 가능하도록 Everyone 을 체크한다. 4. 설치가 완료되면, 환경 변수 설정으로 가서 "~(설치경로)\MPICH2\bin" 파일을 경로설정 한다. 그리고 명령 프롬프트를 종료한다. 5. 다시 명령 프롬프트를 관리자 권한으로 실행하고 다음과 같이 smpd 설치를 진행한다.     cmd>>smpd -install 6.  다음과 같이 해당 컴퓨터 계정을 mpiexec에 등록을 해야 mpiexec가 작동가능하다. 만약 컴퓨터가 메일 계정으로 세팅되어 있다면, 계정에 "AzureAD\메일 주소"을 입력해야 한다. >>mpiexec -register account (domain\user) [AzureAD\이지진]: AzureAD\jjlee@jbcp.kr password: confirm password: Password encrypted into the Registry. 7. 계정이 잘 등록 되어 있는지 확인하기 위해서 다음과 같이 유효성을 확인한다. 만약 이 단계에서 "FAIL"이 뜬다면 다시 설치해야 한다. 보통 계정 설정이 잘못된 경우가 많다. >>mpie

윈도우 파워쉘에서 VI 사용하기

PowerShell에는 프로파일을 통해서 유저의 입맛에 맞게 설정을 바꿀 수 있는데, 이번 글에서는 VI 명령어를 입력하면 자동으로 Vi 에디터가 실행되도록 설정할 것이다. 프로파일이 없는 경우 다음과 같이 생성시킨다. >> new-item -path $profile -type file -force 프로파일이 생성된 이후 규칙을 새롭게 정의해야 하므로 권한을 다음과 같이 올려준다. >>set-executionpolicy Unrestricted >>set-executionpolicy RemoteSigned 이후 생성된 프로파일에 가서 다음과 같은 함수를 정의해 주면 된다. function vi ($File){ $File = $File -replace “\\”, “/” bash -c “vi $File” }

윈도우에서 컴파일러 경로 설정

이미지
컴파일러를 명령 프롬프트에서 이용하려면, 환경 변수 설정을 해야 한다. 제어판 설정에서 바꿀 수 있지만 보안상 추천되지 않고 환경 변수들이 서로 충돌할 수 있으므로 아래와 같이 임시적인 환경 변수 설정을 추천한다. 이 글에서 소개하는 컴파일러 환경 변수 설정 방법들은 현재 사용하고 있는 명령 프롬프트에서만 적용되며, 종료하고 다시 실행하는 경우 초기화 된다. 1. GNU 컴파일러 세트는 "gcc", "g++", "gfortran" 컴파일러로 구성되어 있으며, 설치된 경로에서 bin 폴더를 경로설정 하면 이용 할 수 있다. 예를 들어 다음과 같은 명령어를 실행하면 된다. 파이썬의 경우에도 비슷하게 "python" 인터프리터가 존재하는 폴더에 경로를 설정해 주면 이용가능하다. 명령 프롬프트 >>set path=%path%;C:\nm73g64\gfortran\mingw64\bin 파워쉘 >>$env:path=" C:\nm73g64\gfortran\mingw64\bin" 2. 마이크로 소프트의 "cl" 컴파일러, "csc" 컴파일러 또는 "vbc" 컴파일러의 경우 비주얼 스튜디오가 설치된 경로에서 "vcvars64.bat" 파일을 실행하면 사용 가능하도록 변수들이 설정된다. 만약 32-bit 환경으로 세팅하고 싶다면 "vcvars32.bat"를 모든 환경에 대해서 세팅하고 싶다면 "vcvarsall.bat" 파일을 실행하면 된다. 설정 파일의 경로들은 Visual Studio 마다 다른데 2017 버전의 경우 아래와 같다. >>"C:\Program Files (x86)\Microsoft Visual Studio\2017\Community\VC\Auxiliary\Build\vcvars64.bat"

[Linux] Installing gcc, g++ and gfortran on bash

이미지
1. sudo apt-get update 2. sudo apt-get install gcc 3. sudo apt-get install g++ 4. sudo apt-get install gfortran