Running a notebook server
1. Create a password. You use this password to log in to the Jupyter notebook server from your client so you can access notebooks on the server.
a. Open the iPython terminal.
$ ipython
>> from notebook.auth import passwd
>> In [2]: passwd()
Enter password:
Verify password:
Out[2]: 'sha1:67c9e60bb8b6:9f.....'
b. Record the password hash.
c. Exit the iPython terminal.
>> exit()
2. Create a Jupyter configuration file.
$ jupyter notebook --generate-config
The command creates a configuration file (
3. Update the configuration file to store your password
a. Open the .config file.
$ vi ~/.jupyter/jupyter_notebook_config.py
c.IPKernelApp.pylab = 'inline' # in-line figure when using Matplotlib
c.NotebookApp.ip = '*'
c.NotebookApp.open_browser = False
c.NotebookApp.password = '
c.NotebookApp.password_required = True
c.NotebookApp.port = 8888
4. Computer network port open
run administration cmd
>> netsh advfirewall firewall add rule name="test" dir=in action=allow protocol=tcp localport=8888
to show "test" ports status
to delete "test" ports
>>netsh advfirewall firewall delete rule name="test"
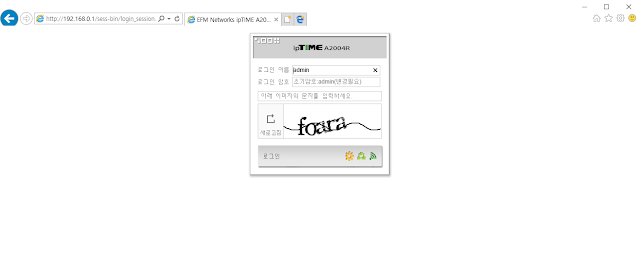
5. Router port open (iptime)
a. http://192.168.0.1
id : admin
passwd : admin

a. Open the iPython terminal.
$ ipython
>> from notebook.auth import passwd
>> In [2]: passwd()
Enter password:
Verify password:
Out[2]: 'sha1:67c9e60bb8b6:9f.....'
b. Record the password hash.
c. Exit the iPython terminal.
>> exit()
2. Create a Jupyter configuration file.
$ jupyter notebook --generate-config
jupyter_notebook_config.py) in the ~/.jupyter directory. 3. Update the configuration file to store your password
a. Open the .config file.
$ vi ~/.jupyter/jupyter_notebook_config.py
c.IPKernelApp.pylab = 'inline' # in-line figure when using Matplotlib
c.NotebookApp.ip = '*'
c.NotebookApp.open_browser = False
c.NotebookApp.password = '
sha1:fc216:3a35a98ed980b9...' c.NotebookApp.password_required = True
c.NotebookApp.port = 8888
4. Computer network port open
run administration cmd
>> netsh advfirewall firewall add rule name="test" dir=in action=allow protocol=tcp localport=8888
to show "test" ports status
to delete "test" ports
>>netsh advfirewall firewall delete rule name="test"
5. Router port open (iptime)
a. http://192.168.0.1
id : admin
passwd : admin

b. connect "8888" port to internal ip


댓글
댓글 쓰기